
Champagne Castle Frontal Route
18 Jun 2019 11:22 - 18 Jun 2019 12:24 #75080
by TheRealDave
Champagne Castle Frontal Route was created by TheRealDave
I first read about the route in the
Cowl Pass thread
, where Jackson gives a good general description (there is also an
MCSA RD
). My interest was sparked partly because of the relative paucity of passes in the Monk’s Cowl area, and partly because the route sounded challenging and spectacular. Papa Dragon and I started planning a date, but last weekend he was presenting at a cock show and I had the itch, so, it being the occasion of my sister’s birthday, I took her and her boyfriend instead. The route is probably best done as a day-loop with Gray’s, as overnight packs will make some of the scrambles harder and riskier. Jackson’s total time for the round-trip back down to KBC is six hours, which even for a very fit hiker seems rather optimistic to me. My sister was very slow, so we ended up descending Gray’s partly by torchlight and (fortunately) moonlight, but for a fit hiker the route is quite feasible in a day. I wouldn’t regard the route as hard for an experienced, adventurous hiker. Cockade and the Elephant is the comparison that comes to mind in respect of both difficulty and views, and if Cockade is a 7, then I would rate this as a 7½. Although the slopes are steep, you are traversing most of the time, and there isn’t much exposure. You do, however, feel that you’re scaling a mountain rather than hiking a pass. The views are truly awesome.
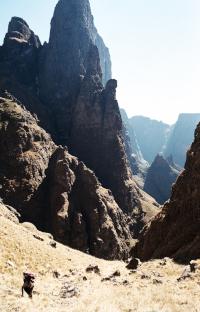
I have marked the route as accurately as I can in the pic below (the final corner is obscured by the face on the right), but, as Jackson says, the way becomes clearer when you’re up there.
From KBC, continue up the terrace as you would to Cowl Pass and cross the riverbed by the cairn. We continued up the terrace for a bit, but one might choose to stay in the riverbed from this point onward, as the grass and shrubs on the terrace are thick. At a certain point, the boulders become the natural way. There are a number of waterfalls which you can easily bypass, mostly on the left.
At the last waterfall, the easiest way seems to be the steep grassy bank on the right, which allows you to bypass a field of rocks and bushes and to traverse back into the head of the valley along a grassy band.
This brings you to the split with the South Gully on your right and the gully behind Cowl on your left. (The South Gully, though loose, looks like it could also go without gear and possibly afford a traverse out left onto the face; Jackson says he did it in snow and ice without a rope.) Head up the Cowl gully passed three boulders till you reach the rock ledge giving access to the first grassy slope. The first scramble of the Cowl gully, on the right, isn’t trivial: I went up to the right of the crack, which involved an awkward knee-leverage move; the others took the left, but this required a hand up from above.
Here is the exit point from above (it looks like there’s an easier way onto the grass higher up, but there isn’t):
This isn’t a difficult scramble, but, as with the other scrambles on this route, a fall could be nasty.
You then traverse across this broad grassy slope.
Looking back along the slope, you can see that the route is a lot less exposed than it looks from below.
Please login or register to view the images attached to this post.
Last edit: 18 Jun 2019 12:24 by TheRealDave.
The following user(s) said Thank You: AdrianT
Please Log in or Create an account to join the conversation.
- TheRealDave
-
 Topic Author
- Offline
- Elite Member
-

Less
More
- Posts: 195
- Thank you received: 256
18 Jun 2019 11:36 - 18 Jun 2019 12:10 #75081
by TheRealDave
Replied by TheRealDave on topic Champagne Castle Frontal Route
Then edge across the rock section at dead centre of the pic below:
Continue on until you can scramble diagonally back up between the rock bands:
From above:
Head up the slope above you and carry on traversing to the right (to the left in the photo):
Then carry on diagonally up the slope.
By this point, the views are becoming quite spectacular:
It seems one must again scramble up the rocks to one's left, and the rock scramble would probably take you to the same point, but it’s easier to carry on round the corner and then scramble up the grassy slope.
Looking back down:
Please login or register to view the images attached to this post.
Last edit: 18 Jun 2019 12:10 by TheRealDave. Reason: Clarification
Please Log in or Create an account to join the conversation.
- TheRealDave
-
Topic Author
- Offline
- Elite Member
-
Less
More
- Posts: 195
- Thank you received: 256
18 Jun 2019 11:42 #75082
by TheRealDave
Replied by TheRealDave on topic Champagne Castle Frontal Route
One then comes to a narrow ledge, which you traverse to reach the final grass slope below the big overhang at the top. Aside from the scrambles, this ledge is the first part of the route that felt truly exposed. Directly above the narrow ledge, you can see the final grass gully.
The traverse towards the gully is clear. It rounds a corner that, as you can tell from the photo above, is also rather exposed.
The traverse towards the gully is clear. It rounds a corner that, as you can tell from the photo above, is also rather exposed.
Please login or register to view the images attached to this post.
The following user(s) said Thank You: Serious tribe, elinda, Stijn, JonWells, ghaznavid, Smurfatefrog, tonymarshall, ASL #Bivak, jackson, ruthtbl, AdrianT, AndrewP, Riaang, Andreas, Papa Dragon, GriffBaker, WarrenM, Super_mil, Slimy, riaan300
Please Log in or Create an account to join the conversation.
- TheRealDave
-
Topic Author
- Offline
- Elite Member
-
Less
More
- Posts: 195
- Thank you received: 256
19 Jun 2019 16:19 - 19 Jun 2019 16:21 #75091
by Serious tribe
Replied by Serious tribe on topic Champagne Castle Frontal Route
That looks awesome. Well done on the route finding. I suppose if you did it with a light pack it should be ok.
Last edit: 19 Jun 2019 16:21 by Serious tribe.
Please Log in or Create an account to join the conversation.
- Serious tribe
-

- Offline
- Platinum Member
-

Less
More
- Posts: 1056
- Thank you received: 770
19 Jun 2019 16:32 #75092
by jackson
Replied by jackson on topic Champagne Castle Frontal Route
Hi Dave
Thanks for the write up, very nicely detailed report! Much more information than I had scribbled down.
You got me thinking about the 6 hour round trip that I stated, so I had to check my notes again. But yes, it does appear that I was maybe fitter than I thought back in the day. It was indeed 6 hours from KBC, up the route, the 3 highest points in the immediate vicinity, and then down Grays to KBC.
I looked at a couple of other notes, and thought I might share them, routes definitely worth doing and very similar.
There is Mlambonja buttress ridge (D), done from pillar cave, up route, down Mashai pass, and back to the cave in sub 7 hours.
Sterkhorn (C), Turret (D), and Amphlett (D). A round trip of three peaks from Blindmans corner campsite- sub 8 hours.
These are all peaks that are doable without gear, and from an appropriate base can be done easily in a day without much fuss. As long as you are comfortable with Berg scrambles!
Hopefully this will wet your appetite Dave, so we can get some more detailed trip reports!
Best regards, Jackson
The following user(s) said Thank You: TheRealDave
Please Log in or Create an account to join the conversation.

20 Jun 2019 07:22 #75097
by Papa Dragon
Replied by Papa Dragon on topic Champagne Castle Frontal Route
Well done, Dave, Ruthh and co.. sorry that I couldn't make this one..
Definitely on my to do list soon though..
Thanks for the other ideas jackson!!!
Definitely on my to do list soon though..
Thanks for the other ideas jackson!!!
Please Log in or Create an account to join the conversation.
- Papa Dragon
-

- Offline
- Platinum Member
-
Less
More
- Posts: 763
- Thank you received: 647
21 Oct 2019 19:28 #75387
by Papa Dragon
Replied by Papa Dragon on topic Champagne Castle Frontal Route
So we finally got to do Champagne Castle Frontal Route last weekend, 11 to 13 October.
This was part of the MCSA KZN Section Centenary Hiking Challenge. We had 9 attendees, and a very enjoyable weekend.
Marco and I travelled up from PMB, and we met Ryan and Robert from GP at Monk's Cowl Office on the Friday morning..The 4 of us had an easy walk up to Keith Bush Camp, but had a leisurely break where the path crosses the Mhlwazini River. There is no water at the crossing, but about 30m downstream the river is flowing reasonably, despite the area being very dry. We ended up loading our packs with 5-6l each of camp water, as we didn't think that we would get at KBC, and thought probably only on the top at Nkosazana river the next day.
The only issue I had was very sore feet and legs from Monk's to KBC, only thing I can put this down to is the first time I have carried a relatively heavy, although it's still not that heavy, pack wearing trail runners and not hiking boots. After our long break, we made our way up to KBC, where we were joined by Smurf, Kate and Kirst, and later by Gordon and Shi-Hsia. A very pleasant evening got very windy at about 2is in the morning.
We had an early start the next morning, with 7 of us deciding to attempt CCFR, and Marco and Gordon electing to summit Champagne Castle via Gray's Pass.
Dave's route notes above are very informative, but in spite of this a few of us, led by me I must admit, took the apparently easier through the bush route on the true right of the Mhlwazini, and due to a communication misunderstanding had to backtrack a bit.
The split in the gullys to which Dave refers to above, is very apparent, with the South Gully coming down from the right as one is ascending, and the gully between Monk;s Cowl and Champagne Castle on the left. This is really like a T-junction, you can't miss it, and one takes the left turn. The first serious obstacle, by the 3 boulders, is fairly close to that, and needs a bit of careful scrambling, has some pretty loose rock, obviously due to being a little-used route. A few hundred metres up the gully you come to a bit of a scramble to get to the grass ledge traverse on your right. Personally I found this the sketchiest bit on the route, where I felt most likely to fall. Funnily enough Dave, in his initial report, and Kate in our party, found the traverse on the narrowish ledge the worst. it is much more exposed, but to me never felt like there was a chance of falling.
Carry on this first ledge traverse, making your way to an obvious point ahead where you can get to above the rock band. Tip: if you get to a smallish cave on your left hand side, double back a few 10s of metres, and scramble up through the rock bands to your right, turn back to the right again as soon as you can. As soon as you can, turn left onto the next grassy ledge, the exposed narrow one, and follow the route as Dave describes.
We topped out of the top gully after 7 hours, but there were 7 in the group, so obviously each obstacle takes a while to get the group through, and we took a wrong line as I said earlier, and had a small route finding issue at the turn near the top (the turn from right to left, behind the ridge in Dave's pic above.)
After a well deserved break at the top of the top gully, we started the next slog up to Champagne Castle summit cairn. After this, we made our way down to the Nkosazana valley, down river, with some visiting the cave on the way. We descended via Gray's pass, with the last of us getting back to camp just after dusk.
We had left out tents pitched for the ascent, but had stashed our packs close to KBC, fortunately, Marco, who ascended and descended Gray's had brought most of our packs back to our tents.
Anyway, a most enjoyable weekend, an awesome alternate route to the summit, amazing views, and good company.
Thanks to Dave and jackson for route advice, Smurf for your help, and to the team for making it a memorable weekend.
I have asked Smurf to edit and add pics, as mine didn't turn out well.
The following user(s) said Thank You: JonWells, ghaznavid, hikingle, Smurfatefrog, tonymarshall, jackson, ruthtbl, Riaang, TheRealDave
Please Log in or Create an account to join the conversation.
- Papa Dragon
-
- Offline
- Platinum Member
-
Less
More
- Posts: 763
- Thank you received: 647
21 Oct 2019 20:00 #75388
by Smurfatefrog
Replied by Smurfatefrog on topic Champagne Castle Frontal Route
Heading up valley. We had running water from about 2400m all the way to about 2600m
South gully (not the way we went up)
Looking down from the first scramble
The scramble onto the grass ledge
The top of the pass in the low point
South gully (not the way we went up)
Looking down from the first scramble
The scramble onto the grass ledge
The top of the pass in the low point
Please login or register to view the images attached to this post.
The following user(s) said Thank You: Serious tribe, elinda, Stijn, JonWells, ghaznavid, hikingle, tonymarshall, jackson, ruthtbl, AdrianT, Riaang, Papa Dragon, TheRealDave
Please Log in or Create an account to join the conversation.
- Smurfatefrog
-

- Offline
- Moderator
-

Less
More
- Posts: 1132
- Thank you received: 1550
22 Oct 2019 20:13 #75390
by Smurfatefrog
Replied by Smurfatefrog on topic Champagne Castle Frontal Route
Here is the GPS track from Keith Bush Camp to the pass summit
Please login or register to view the file attached to this post.
Please Log in or Create an account to join the conversation.
- Smurfatefrog
-
- Offline
- Moderator
-
Less
More
- Posts: 1132
- Thank you received: 1550
